My weekend was filled with lots of colorful melted glass!
And some twisted and melted wire, too!
About Me

- Kristen
- I am an artist, wife and mother, paraeducator, yo-yo dieter, and small town country girl. I love singing in my church choir, computer time, beading and making jewelry. And I love enameling! There is something very magical about turning powder into smooth, shiny, and colorful glass.
Tuesday, May 29, 2012
Saturday, May 26, 2012
Weekend Warrior
I'm making good use of my disc cutter and kiln today! After cutting and drilling all these blanks I'm ready to fire up my kiln. These toggle clasps are my best sellers and they're fun to make. I think I will do some experimenting with transparent colors over different base colors. I'll keep you posted!
Wednesday, May 23, 2012
(almost) Wordless Wednesday
This butterfly was so fluttery and flighty, I had to stalk it for quite a while to get these great pictures plus a lot of terrible ones. Amazing and elusive.
Tuesday, May 22, 2012
Using Cloisonne Wire
 |
| Zigs and Zags |
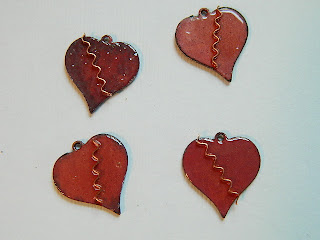
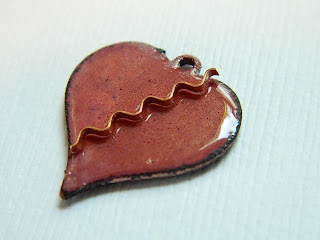
I enameled the backs and the fronts in a layer of clear and then counter enameled the backs with one coat of Orient Red. I then cut the wire to fit on the fronts. It's OK if the wire is a bit too long. I placed the wire where I wanted it and using a paintbrush, I put drops of my adhesive under the wire.
Let it dry completely and fire it for 2 minutes or until the wire sinks slightly into the clear enamel.
Make sure you put it in the pickle after every firing to make sure you get all the fire scale off the wire. Mix a small amount of Orient Red enamel with a few drops of distilled water. If it's too watery just use a "point" of paper towel to absorb the excess.
Using a paintbrush push the enamel mixture next to the wire.
I decided to put black around the edges. I used a small paintbrush to add some amounts of distilled water to try to blend the colors. Then I put it on top of my kiln until it was completely dry and fired it. When cool I repeated the process but I wanted the colors to be a bit more gradual so I added some Victoria red. After this firing, cut or file the wire to the edges.
My final coat was another layer of clear. I sifted it heavier over the wire so it would cover it completely and fired until very shiny. These are my Broken Heart charms!
Sunday, May 20, 2012
Weekend Warrior
I wished I had more time this weekend for enameling but the gorgeous weather was calling to me so I went for a long walk, strolled around my yard admiring the new growth in my husband's flower gardens, and chased a butterfly with my camera. (more on that another day) I did work some new toggles. The anticipation of blooming perennial flowers inspired these colorful toggles! I have made sterling bars and I will wrap them with matching colored wire. Wild!
Wednesday, May 16, 2012
(almost) Wordless Wednesday
I've always been intrigued by the ever changing and fleeting art work of shadows. I happened to look out my second floor studio window and caught this silhouette of my neighbor's oak tree casting a summery shadow across our lawns and little road.
Perfect!
Perfect!
Tuesday, May 15, 2012
Tuesday's Tools
Zigging and Zagging my Wire
I wanted to find a tool to crimp my bezel and cloisonne wire. I thought it would be fun to put wire into my enameled pieces. I also envision some funky wire wraps. And I wanted something heavy duty enough to ruffled the edges of thin sheet metal. I found this tube-wringer in TDSONLINESTORE. It's one of my favorite supplies shops on Etsy and their prices are reasonable. I was surprised that it actually is made to wring the stuff out of a large tube of something. Hence, it's name and "duh" to me.It has a crank handle on one side,
and gears in the middle.
 |
| what a mess! |
I started with some copper cloisonne wire. One end of the wire goes between the gears, turn the handle while holding it closed, and out comes:
zigs and zags of wire! Now what can I make with this? Any ideas?
Monday, May 14, 2012
Weekend Warrior (part 2)
Another thing I got done this weekend was to finish these enameled clasps. They aren't a new design but I'm presently sold out. The last one I had I submitted to Stringing Magazine for Beads 2012 and it got excepted! Beads 2012 will be a supplement to the Fall issue of Stringing. Very exciting!!
I figure that gives me all summer to make lots of these for all my anticipated sales. I can dream, can't I? In the mean time, I have a few I will be listing in my Etsy shop.
Leaves have finally bloomed everywhere and the world is green again!
I figure that gives me all summer to make lots of these for all my anticipated sales. I can dream, can't I? In the mean time, I have a few I will be listing in my Etsy shop.
Leaves have finally bloomed everywhere and the world is green again!
Sunday, May 13, 2012
Weekend Warrior (part 1)
Beads of Many Colors!
Saturday was a bead making day and lots of colorful beads popped out of my kiln!! I love to make coordinated bead sets because I find them very inspiring when I making a finished piece of jewelry. | ||||
| crayon box colors |

Orange is the color of the season: Marigld, Pumpkin, and Ochere Yellow (Schauer)
Beautiful blues: Bonnet, Harvest, and Darkest Blue
 |
| Beads of many colors!! |
Wednesday, May 9, 2012
(almost) Wordless Wednesday
You're Looking at my Summer Vacation
When my husband gave me the news that our pickup truck was going to cost about $2000 to fix, I said goodbye to our summer beach vacation. I'll just have to gaze at these gorgeous sea and sand inspired beads instead!Hand crafted by Lynda. Check out all of her amazing beads in her Etsy shop.
Tuesday, May 8, 2012
Tuesday's Tutorial
Wire Wrapped Toggle Bars
I use either 14 or 16 gauge wire in brass, copper, or argentium sterling to make my toggle bars. Working from the spool, hammer just the tip of the wire so that the wire wrap doesn't slide off. I use a needle file to round the end.
To get your toggle the right size, position the hammered end just slightly off the edge of the toggle. This will ensure that the bar will be long enough and your clasp won't come undone. Mark the wire at the center of the opening.
Put your needle nose pliers just past the mark
and wrap the wire around once. Cut the other end the same length and hammer the tip like before. I put my wire components in my tumbler to make them strong and shiny. You could also hammer them with a rubber mallet.
I cut a 12 inch piece of colored wire and wrapped it around once or twice close to the hammered end and leave a tail.
Using the flat nose pliers, grab the end and the tail at the same time.
Wrap the wire around the bar keeping the coil as tight as you can.
When you get to the middle, just pass the wire over the top and continue wrapping on the other side. You can use your fingers to hold the bar now.
Cut the ends and squeeze the ends to the bar.
Unique and colorful!!
Monday, May 7, 2012
Weekend Warrior
Most of my studio time this weekend was spent on custom orders but I did have time to make these two toggle bars using my new colored wire. I like how they came out and I can picture changing up the colored wire to match your jewelry color scheme. I also think these bars would look great with metal toggles.
Tune in tomorrow for Tuesday's Tutorial and I'll show you how to make these!
Tune in tomorrow for Tuesday's Tutorial and I'll show you how to make these!
Friday, May 4, 2012
Backyard Muse
My wonderful husband is a very talented flower gardener and he has filled our yard with perennial gardens. We like to walk around our yard in the early Spring looking for the peeking sprouts and watching them bloom.
I feel compelled to take pictures of flowers and foliage every year even though I probably have the exact same pictures from last year.
The colors and shapes are ever changing and always inspiring to me.
My husband dug up the little green car when he was gardening one day and it has sat on this rock ever since!
My backyard muse.
Subscribe to:
Comments (Atom)


